TuTorial Video Klik
DISINI
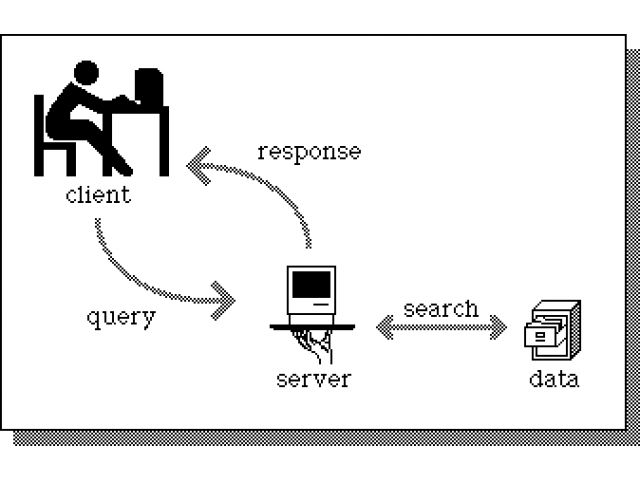
Pada tutorial ini anda akan belajar bagaimana membuat aplikasi client server menggunakan visual basic & MYSQL Untuk lebih memperjelas pemahaman anda akan digunakan studi kasus program KASIR.
Dimana pada implemantasinya nanti, aplikasi yang dibuat akan terpisah
dengan database. Database akan ditempatkan pada sebuah server dan
aplikasi dapat ditempatkan pada beberapa komputer client. Untuk
pengembangan / pembuatan aplikasinya sendiri dapat dilakukan di komputer
lokal terlebih dahulu. Adapun yang anda perlukan pada tutorial ini,
yaitu visual basic, MYSQL, dan Mysql
Connector-ODBC. MYSQL dan MYSQL Connector ODBC dapat anda download di
www.mysql.com. MYSQL Connector ODBC dibutuhkan agar dapat melakukan
koneksi database MYSQL dari VB
Setelahnya semuanya terinstall mulailah membuat database MYSQL beserta tabel - tabelnya. Buatlah sebuah database dengan nama kasir, dan buat 5 tabel seperti di bawah:
Tabel user_login
| Field | Tipe Data |
| user_login_id | varchar(50) * |
| user_name | varchar(100) |
| user_psw | varchar(20) |
Tabel product
| Field | Tipe Data |
| product_id | varchar(40) * |
| product_name | varchar(100) |
| price | double |
| stock | integer |
Tabel transaksi
| Fields | Tipe Data |
| no_transaksi | integer (auto increment) * |
| tgl_transaksi | datetime |
| total_barang | integer |
| total_harga | double |
| kasir | varchar(50) |
Tabel detail_transaksi
| Fields | Tipe Data |
| no_transaksi | integer |
| product_id | varchar(40) |
| jumlah | integer |
| harga_satuan | double |
Tabel transaksi_temp
| Fields | Tipe Data |
| no_transaksi | integer |
| product_id | varchar(40) |
| jumlah | integer |
| harga_satuan | double |
* Primary Key
Tabel
user_login digunakan untuk menyimpan data pengguna aplikasi, tabel
product digunakan untuk menyimpan data product yang dijual. Tabel
transaksi untuk menyimpan data transaksi dan tabel detail_transaksi
untuk menyimpan detail dari transaksi yang dilakukan. Sedangkan tabel
traksaksi_temp digunakan untuk mencatat secara sementara detail
traksaksi yang dilakukan, setelah transaksi selesai dilakukan baru
dipindahkan ke tabel transaksi.
Setelah database dan kasir selesai dibuat tambahkan data (insert data) pada tabel user dengan data berikut:
| user_login_id | user_name | user_psw |
| admin | Administrator | admin |
langkah selanjutnya adalah mempersiapkan koneksi ke database. Ikutilah langkah-langkah di bawah ini.
- Buka control panel, double klik pada Administrative Tools, kemudian double klik pada Data Sources (ODBC). Dan akan muncul window kurang lebih seperti berikut:

- Klik pada System DSN, dan klik tombol Add, dan akan muncul window seperti berikut:

- Pilih MySQL ODBC 3.5.1 Driver, dan klik tombol Finish, dan akan tampil window berikut :

- Kemudian isi form di atas dengan data seperti berikut:

- Klik tombol Test, jika muncul kotak dialog yang menyatakan sukses, tekan OK dan tekan OK sekali lagi.
Setelah selesai sekarang anda telah siap untuk membuat Aplikasi KASIR..
Membuat Form Utama Administrator dan Form Login
Buka microsoft visual basic anda dan buat
Standar EXE project.
Setelah project dibuat akan langsung terbentuk sebuah form. Tambahkan
label dan tombol serta atur propertiesnya seperti berikut :

| Komponent | Properties |
| Form1 | Name : main_form
Caption : Administration |
| Label1 | Caption : Welcome, |
| Label2 | Name : label_user
Caption : User |
| Command1 | Name : btn_user
Caption : User |
| Command2 | Name : btn_product
Caption : Product |
| Command3 | Name : btn_trans
Caption : Transaksi |
| Command4 | Name : btn_report
Caption : Report |
Setelah diatur propertinya maka hasilnya adalah seperti berikut:
 Admin Form
Kemudian Buat Form baru dengan cara, klik Menu Project, Add Form. Akan tampil window
Add Form dan pilih
Log In Dialog serta klik tombol open. Hasilnya seperti di bawah:
 Form Login
Sekarang buka notepad dan ketik kode di bawah:
[Data]
DB=kasir
SERVER=localhost
Uid=root
Password=root
Kemudian simpan di direktori c:\windows dengan nama koneksi.ini, file koneksi.ini berfungsi untuk menyimpan data yang diperlukan untuk koneksi ke database. Pada bagian DB berisi nama database yang akan digunakan, SERVER berisi IP address Server tempat database disimpan (untuk sementara gunakan lokalhost). Uid berisi database user name dan Password adalah password database.
Sekarang
Kembali ke Editor Visual Studio. Pilih Menu Project, Add Module untuk
membuat module. Pada window Add Module klik Open.
Download File berikut ini,
kemudian copy dan paste isi file tersebut pada module yang sedang
dibuat. Setelah selesai simpan module tersebut. Kemudian Klik menu
Project, References dan akan muncul window project reference. Centang
pada bagian
Micosoft ActiveX Data Objects 2.0 Library dan tekan tombol OK.
Sekarang beralih ke form login, double click pada tombol OK, Hapus script yang telah ada dan ganti dengan script di bawah:
Private Sub cmdOK_Click()
Call Koneksi
Dim RS As ADODB.Recordset
Set RS = New ADODB.Recordset
Dim SQL As String
'query untuk login
SQL = "select * from user_login where user_login_id='" & txtUserName.Text & "'"
'membuka koneksi ke databse
RS.CursorLocation = adUseClient
RS.Open SQL, conn, adOpenDynamic, adLockOptimistic
'cek kebenaran user_login_id
If (RS.RecordCount > 0) Then
'cek kebenaran password
If (RS!user_psw = txtPassword.Text) Then
user_login_id = txtUserName.Text
user_name = RS!user_name
Load main_form
main_form.Show
Unload Me
Else
MsgBox "Maaf Password Salah"
End If
Else
MsgBox "Maaf User Name Salah"
End If
End Sub
Kemudian double click pada tombol Cancel, hapus script yang telah ada dan ganti dengan script berikut:
Private Sub cmdCancel_Click()
Dim pil As VbMsgBoxResult
pil = MsgBox("Anda Yakin untuk keluar?", vbQuestion + vbYesNo, "Exit")
If (pil = vbYes) Then Unload Me
End Sub
Setelah selesai pilih menu Project, properties. Pada window Project Properties di bagian Startup Object pilih frmLogin. Kemudian tekan tombol OK.
Sekarang beralih ke admin_form, double click pada form dan ketik script berikut :
Private Sub Form_Load()
label_user.Caption = user_name
End Sub
Setelah selesai simpan project anda dengan nama kasir dan coba untuk menjalankanya dengan menekan tombol F5 pada keybord.
Pada
tutorial Membuat Aplikasi Client Server dengan VB & MYSQL ini anda
telah belajar bagimana menginstall MySQL connector ODBC, melakukan
koneksi ke database MySQL dengan ADODB, serta membuat system login.
Pada tutorial selanjutnya akan dijelaskan Proses membaca data dari tabel, menampilkan data, menambahkan data ke tabel, mengedit record pada tabel dan menghapus record.
source: myphptutorials.com
UPDATE 3 July 2011
quote :
" Databasenya mau pakai apa,
Database Server(sql server,mysql) atau database File (Ms. Access)
misal database yang dipakai SQL Server :
* pertama database server harus terinstall terlebih dahulu di salah satu komputer
* jika sudah berarti program di tiap-tiap client harus merujuk ke
database yg sql servernya terinstall, agar data yang di olah bisa sama
untuk seluruh client.
* dan... di masing-masing client untuk bisa masuk ke database server harus mengisi login dari server terserbut
misal:
computer name = server
user database = sa
password database = ***
database = dbinventory
* dan... agar program di client bisa jalan, component-component yang
diperlukan harus sudah terinstall (teregistrasi) di client tersebut "
" kalau
databasenya ms access database tersebut tempatkan di computer server
terus folder dimana database tersebut berada harus di Share (supaya
komputer client bisa memanggil)
dan untuk koneksinya (menambahkan code diatas):
Dim con As ADODB.Connection
Dim pathDb As String

 pathDb = "\\compServer\dbStok.mdb"


 con.ConnectionString = "Provider=Microsoft.Jet.OLEDB.4.0;Data Source="
& pathDb & ";Persist Security Info=False"
con.Open
"
Creating Client/Server Application using Winsock
INTRODUCTION
Most
of you might have worked with Internet Transfer Control which is very
handy control when it comes to Internet Programming but there is another
control which even more robust and helps programmers creating more
flexible applications. Winsock control comes with VB6 and is used to
create applications that access the low-level functions of the
Transmission Control Protocol/Internet Protocol (TCP/IP).
TCP/IP is a specification that defines a series of protocols used to
standardize how computers exchange information with each other. TCP/IP
provides communication across interconnected networks that use diverse
hardware architectures and various operating systems. The protocols in
TCP/IP are arranged in a series of layers known as a protocol stack.
Each layer has its own functionality.
Winsock
is a standard that is maintained by Microsoft. This standard is
basically a set of routines that describe communications to and from the
TCP/IP stack. These routines reside in a dynamic link library that runs
under Windows. The winsock DLL is interfaced with TCP/IP and from there
through the Internet.
In
this article, I am going to show how to use the winsock in a client
server environment, we will create two separate applications, one of
which will be a server and the other will be a client. Both client and
server will interact with each other to exchange data. Client will send a
request to the server and the server which will be connected to a
database will retrieve the information requested by the client from the
database and will return the requested information back to the client.
You will a database with this article, the database contains the item
numbers and their prices. In real life situations, database might be
located on a machine different from the one that hosts the client
application.
I think it would be better to talk about the
ports before we proceed any further. A port is a special memory location
that exists when two computers are in communication via TCP/IP.
Applications use a port number as an identifier to other computers, both
the sending and receiving computers use this port to exchange data.
To make the job of communication easier, some port numbers have been
standardized. These standard port numbers have no inherent value other
than that users have agreed to use them with certain applications. Table
below lists a number of popular and publicly accepted port numbers and
their corresponding applications.
|
Service
|
Port
|
| HTTP | 80 |
| FTP | 20,21 |
| GOPHER | 70 |
| SMTP | 25 |
| POP3 | 110 |
| TELNET | 23 |
| FINGER | 79 |
| LOCAL LOOPS/CALLBACKS | 0 |
Using the Winsock Control
Winsock
is above the TCP/IP protocol stack in the ISO/OSI model. TCP/IP is an
industry standard communication protocol that defines methods for
packaging data into packets for transmission between computing devices
on a heterogeneous network. TCP/IP is the standard for data transmission
over networks, including the Internet. TCP establishes a connection for
data transmission and IP defines the method for sending data packets.
The Microsoft Winsock control makes using the TCP/IP a breeze.
Microsoft has wrapped up the Winsock and INetAPI API calls into a nice
neat package that you can easily incorporate into your Visual Basic
applications.
Winsock Operating Modes
The
Transport layer (also known as the Host-to-Host Transport layer) is
responsible for providing the Application layer with session and
datagram communication services. The core protocols of the Transport
layer are TCP and User Datagram Protocol (UDP). The Winsock control
supports the following two operating modes:
- sckTCPProtocol
- sckUDPProtocol
Winsock Properties
Winsock
enables you to create clients and servers using the same control. This
dual functionality enables you to specify through property setting the
type of application you will be building. The Winsock control uses a
number of the same properties, whether you are creating client or a
server, thereby all but eliminating the learning curve needed to create
applications. Some of the important properties of the control are as
following:
BytesReceived Property
This property returns the number of bytes currently in the receive
buffer. This is a read-only property and is unavailable at design time.
The value returned is a long integer.
LocalHostName Property
The LocalHostName property returns the name of the local host system.
This is read-only property and is unavailable at the design time. The
value returned is a string.
LocalIP Property
The LocalIP property returns the local host system IP address in the
form of a string, such as 11.0.0.127. This property is read-only and is
unavailable at design time.
LocalPort Property
This property returns or sets the local port number. This can be both
read from and written to and is available at both design time and
runtime. The value returned is a long integer.
Protocol Property
Returns or sets the protocol, either TCP or UDP, used by the Winsock control.
RemoteHost Property
The RemoteHost property returns or sets the remote host. This can be
both read from and written to and is available both in design time and
runtime. The value returned is a string and can be specified either as
an IP address or as a DNS name.
RemotePort Property
This property returns or sets the remote port number.
State Property
This returns the state of the control as expressed by an enumerated
list. This is read-only property and is unavailable at design time.
Winsock Methods
Some of the important methods of Winsock control are as following:
Accept Method
It accepts the request for connection from the client system. For this
method to be used, the control must be in the listening state.
Close Method The Close method terminates a TCP connection from either the client or server applications.
GetData Method
GetData is the method that retrieves the current block of data from the
buffer and then stores it in a variable of the variant type.
PeekData Method The PeekData method operates in a fashion similar to the GetData method. However, it does not remove data from the input queue.
Listen Method
This is invoked on the server application to have the server
application wait for a TCP request for connection from a client system.
SendData Method This method dispatches data to the remote computer. It is used for both the client and server systems.
Connect Method The Connect method requests a connection to a remote computer.
I am not going to discuss events here. You can find the complete details of events on the Microsoft site (
http://www.microsoft.com).
In the sample provided with this article, we are going to create two
applications, one server and client. This is a real world example, where
the clients requests some information from the server and the server
retrieves some specific information from the database and sends the
retrieved information back to the client. The database used in the
sample is also provided with the code. The database name is Prices.mdb.
This is a small database comprising of a single table containing two
fields. The fields are item number and price. The clients sends the item
number to the server and the server retrieves the price against that
item number from the database and sends it back to the client. One of
the current trends in software development today is the issue of thick
clients versus thin clients. A thick client is basically an application
that performs the bulk of the processing on the individual client PC,
whereas a thin client performs the processing on the server.
Creating the Client
Follow the steps shown below:
1. Start a new EXE project.
2. Add a Winsock control to your application.
3. Add all the controls to the form (See the application for details).
Here is the complete code:
 Collapse
Option Explicit Private Sub cmdClose_Click() Winsock1.Close shpGo.Visible = False shpWait.Visible = False shpError.Visible = True End Sub Private Sub cmdConnect_Click() Winsock1.RemoteHost = "11.0.0.1" 'Change this to your host ip Winsock1.RemotePort = 1007 Winsock1.Connect shpGo.Visible = True txtItem.SetFocus End Sub Private Sub cmdSend_Click() If Winsock1.State = sckConnected Then Winsock1.SendData txtItem.Text shpGo.Visible = True Label3.Caption = "Sending Data" Else shpGo.Visible = False shpWait.Visible = False shpError.Visible = True Label3.Caption = "Not currently connected to host" End If End Sub Private Sub Winsock1_DataArrival(ByVal bytesTotal As Long) Dim sData As String Winsock1.GetData sData, vbString 'Label1.Caption = sData txtPrice.Text = sData Label3.Caption = "Received Data" shpGo.Visible = True shpWait.Visible = False shpError.Visible = False End Sub Private Sub Winsock1_SendComplete() Label3.Caption = "Completed Data Transmission" End Sub
Creating the Server
The
server portion of the price lookup example is designed to accept the
item number sent from the client and look up the associated price in a
database. The server than sends the information back to the client.
There is file named as �path.txt� in the folder called as �server�.
Locate that file and change the database path in the file to the
location where the database is located on your machine. The connection
to the database is made in the DataArrival event of the Winsock control.
The following code segment opens the database and finds the first
occurrence of the value in sItemData. When the record is found, the
value contained in the price field is sent back to the client.
Collapse
' Get clients request from database strData = "Item = '" & sItemData & "'" rs.Open "select * from prices", strConnect, adOpenKeyset,adLockOptimistic rs.Find strData strOutData = rs.Fields("Price")
Follow the steps shown below to create the server:
1. Start a new Standard EXE in VB.
2. Add the Winsock control to your application.
3. Add the controls to the form as shown in the accompanying code (See the folder named as �server�).
Here is the complete code:
Collapse
Option Explicit Dim iSockets As Integer Dim sServerMsg As String Dim sRequestID As String Private Sub Form_Load() Form1.Show lblHostID.Caption = Socket(0).LocalHostName lblAddress.Caption = Socket(0).LocalIP Socket(0).LocalPort = 1007 sServerMsg = "Listening to port: " & Socket(0).LocalPort List1.AddItem (sServerMsg) Socket(0).Listen End Sub Private Sub socket_Close(Index As Integer) sServerMsg = "Connection closed: " & Socket(Index).RemoteHostIP List1.AddItem (sServerMsg) Socket(Index).Close Unload Socket(Index) iSockets = iSockets - 1 lblConnections.Caption = iSockets End Sub Private Sub socket_ConnectionRequest(Index As Integer, ByVal requestID As Long) sServerMsg = "Connection request id " & requestID & " from " & Socket(Index).RemoteHostIP If Index = 0 Then List1.AddItem (sServerMsg) sRequestID = requestID iSockets = iSockets + 1 lblConnections.Caption = iSockets Load Socket(iSockets) Socket(iSockets).LocalPort = 1007 Socket(iSockets).Accept requestID End If End Sub Private Sub socket_DataArrival(Index As Integer, ByVal bytesTotal As Long) Dim sItemData As String Dim strData As String Dim strOutData As String Dim strConnect As String ' get data from client Socket(Index).GetData sItemData, vbString sServerMsg = "Received: " & sItemData & " from " & Socket(Index).RemoteHostIP & "(" & sRequestID & ")" List1.AddItem (sServerMsg) 'strConnect = "Provider=Microsoft.Jet.OLEDB.4.0;Data Source=G:\Prices.mdb;Persist Security Info=False" Dim strPath As String 'Change the database path in the text file Dim fso As New FileSystemObject, txtfile, _ fil1 As File, ts As TextStream Set fil1 = fso.GetFile("path.txt") ' Read the contents of the file. Set ts = fil1.OpenAsTextStream(ForReading) strPath = ts.ReadLine ts.Close Set fso = Nothing strConnect = "Provider=Microsoft.Jet.OLEDB.4.0;" & _ "Persist Security Info=False;Data Source=" & strPath & _ "; Mode=Read|Write" Dim rs As New ADODB.Recordset ' Get clients request from database strData = "Item = '" & sItemData & "'" rs.Open "select * from prices", strConnect, adOpenKeyset, adLockOptimistic rs.Find strData strOutData = rs.Fields("Price") 'send data to client sServerMsg = "Sending: " & strOutData & " to " & Socket(Index).RemoteHostIP List1.AddItem (sServerMsg) Socket(Index).SendData strOutData End Sub
Running the example
1. Create executable for both the applications.
2. Launch both the applications.
3. Click the Connect button.
4. Enter a value from 0 to 6 (currently the database contains only six
records, error handling is not done in this code, you can add the error
handling yourself) and click the Lookup button. The associated price
will be displayed in the price field.
source: codeproject.com


 Jadi manifest itu sendiri akan mengikuti style pada platform itu sendiri :)